on
JAVA - 3
Object와 OOP(Object-Oriented Programming)
Fastcampus 강의, programmers 강의와 부족한 부분들을 검색하면서 공부할 예정이다.
Reference data type variable
- variable’s data type
- Primitive type(기본 자료형) :
int, long, short, byte, boolean, float, double, char총 8가지를 제공. - Reference type(참조 자료형) :
String, Student, Subject...등등 기본형을 제외한 data type이 reference data type이다.- 기본 자료형은 사용하는 메모리의 크기가 정해져 있지만, 참조 자료형은 클래스에 따라 다르다.
- 참조 자료형을 사용 할때는 해당 변수에 대해 생성을 해야한다. (String 클래스는 예외적으로 생성하지 않고 사용할 수 있음)
- 우리가 만드는 class들은 변수의 객체 자료형으로 사용될 수 있다.
- Primitive type(기본 자료형) :
직접 Reference data type 만들어보자
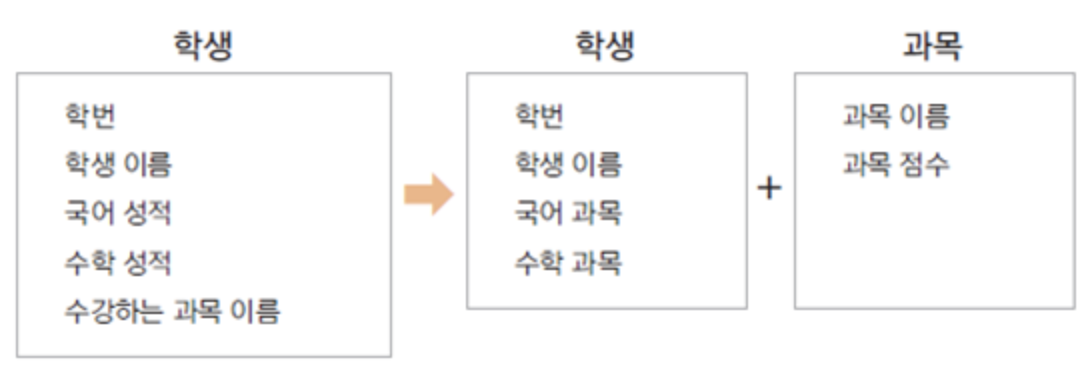
사진출처 : fastcampus
학생과 수업과목에 대해서 class를 분리했다. → 분리해서 쓰면 각 객체에 대한 역할과 기능을 분명히 할 수 있게 되기 때문에 분리한 것.
아래는 위 그림처럼 객체를 정의하기 위해서 작성한 class code이다.
// Student.java file
class Student{
  int studentId;
  String studentName;

  Subject korea; // Constructor에서 인스턴스를 생성해줬다.
  Subject math; // Subject라는 variable data type을 선언.

  Student(int studentId, String studentName) {
    this.studentId = studentId;
    this.studentName = studentName;

    this.korea = new Subject(); // Student 인스턴스를 생성함과 동시에 Subject 인스턴스도 생성.
    this.math = new Subject(); // this는 없어도 상관없다.
  }

  void setKoreaSubject(String name, int score) {
    korea.subjectName = name;
    korea.score = score;
  }

  void setMathSubject(String name, int score) {
    math.subjectName = name;
    math.score = score;
  }

  void showStudentSocre() {
    int total = korea.score + math.score;
    System.out.println(studentName +  " 학생의 총점은 " + total + "점 입니다." );
  }
}
// Subject.java file
class Subject{
  String subjectName;
  int score;
}
// Test.java file. Class 테스트용 코드
public class Test{
  public static void main(String[] args) {
    Student stdKim = new Student(1234, "xi-JJun"); // Student instance 생성.
    stdKim.setKoreaSubject("korea", 45);
    stdKim.setMathSubject("math", 94);
    stdKim.showStudentSocre();
  }
}
Access Modifier(접근 제어 지시자)
- Class 외부에서 class의 member variable, method, constructor를 사용할 수 있는지 여부를 지정하는 키워드이다.
private: 같은 class 내부에서만 접근이 가능.(외부 class+상속관계 class도 접근 불가)- Default(아무것도 안적을 때) : 같은 package 내부에서만 접근 가능.
protected: 같은 package나 상속관계에서 접근이 가능. 그 외 외부에서는 접근이 불가능.public: class의 외부 어디서나 접근이 가능.
Get() / Set() method
그러면 private으로 선언되면 어떻게 instance variable에 접근할 수 있는가?? 라는 물음표가 생긴다.
→ private으로 선언된 member variable(fields)에 대해 접근+수정이 가능한 method를 public으로 제공.
따라서 private으로 선언된 변수를 method에서 제어할 수 있다.
Q1) 아니 굳이?? 그냥 instance variable을 public으로 제공하고 직접 접근하면 더 편한데 왜 굳이 method를 만들어가며 귀찮게 하는 것인가?
A1) 예시 상황 : 날자 데이터를 받아서 출력.
날짜를 계산할 때 세상 어디에도 0월이나 17월 같은 month는 존재하지 않는다. 아래 코드를 보도록 하자.
// BirthDay Class가 존재한다고 가정. 해당 Class는 month라는 instance variable을 가진다고 해보자.
BirthDay date = new BirthDay();
date.month = 1000; // 이 세상에 1000달이라는 month는 존재하지 않는다...
만약에 우리가 instance variable에 접근할 수 있다면 위와 같은 상황이 벌어질 수 있다. 그러나 아래 코드와 같이 instance variable에 접근하는 것을 method로 제어한다면 member variable의 오용을 막을 수 있다.
// BirthDay라는 Class의 method. 해당 Class는 month라는 instance variable을 가진다고 해보자.
public void setMonth(int month) {

  if ( month < 1 || month > 12) { // if month is not 1~12, then false.
    isValid = false;
  }
  else {
    this.month = month;
  }
}
우리가 의도한대로 1~12달만 입력받도록 할 수 있다.
Encapsulation(캡슐화)
Encapsulation : 객체를 감싸서 외부에서 사용할 꼭 필요한 method만 제공. 나머지는 자동으로 모든 것이 생산될 수 있게 한다.
- 꼭 필요한 정보와 기능만 외부에 오픈함.
- 대부분의 멤버 변수와 메서드를 감추고 외부에 통합된 인터페이스만은 제공하여 일관된 기능을 구현 하게 함.
- 각각의 메서드나 멤버 변수를 접근함으로써 발생하는 오류를 최소화 한다.
this
이전 포스팅에서 this에 대해 잠깐 언급을 했었다. 이번에 더 자세히 알아보도록 하겠다.
- instance 자신의 메모리를 가리킨다.
- 생성자에서 또다른 생성자를 호출할 때 사용할 수 있다.
- 자신의 주소(reference value)를 반환한다.
this: Instance 내부에서 자기 자신의 주소값을 갖는 것
생성된 instance의 주소를 가리킨다는 것이다. 진짜?? 라는 마음에 테스트 코드를 작성해서 실험해봤다. 내 Github
class Test{
    public static void main(String[] args) {
        This test = new This(111, "324");
        test.checkThisMethod(444);
        System.out.println("reference value : " + test); // 참조변수 값 출력
        System.out.println(test.aaa);
    }
}
class This{
    int aaa;
    String bbb;
    This(int aaa, String bbb) {
        this.aaa = aaa;
        this.bbb = bbb;
        System.out.println("this in Constructor : " + this);
    }
    void checkThisMethod(int anything){
        aaa = anything;
        System.out.println("this in method : " + this);
    }
}
➜  12 git:(main) ✗ java Test
this in Constructor : This@2a139a55
this in method : This@2a139a55
reference value : This@2a139a55
444
보다시피 this와 참조변수 모두 같은 값을 가지는 것을 볼 수 있었다.
more about ‘this’

public void setYear(int year) {
  this.year = year;
}
그림을 보면, Reference variable인 day는 BirthDay라는 class의 인스턴스 주소값을 갖고 있다. 그림의 생성된 다음의 코드를 보도록 하자. setYear()라는 method가 호출됐다. 여기서 method는 바로 위에 있는 코드와 같다. 코드에서 this가 쓰였고 이는 Stack 영역에 저장이 된다. 같은 인스턴스의 method이기 때문에 this와 reference variable day는 같은 곳을 가리킨다.
Constructor에서 다른 Constructor를 호출하기 위한 this
생성자는 아무때나 호출될 수 없다고 배운지 10분만에 호출한다고 말하는게 이상했다. 생성자는 인스턴스 생성할 때에만 new키워드랑 같이 쓰인다고 배웠는데 무슨소리일까??
클래스에 생성자가 여러 개 인경우, this를 이용하여 생성자에서 다른 생성자를 호출할 수 있다. 아래의 예시 코드를 보도록 하자.
public class Person {

  String name;
  int age;

  public Person() {
    // this 이전에는 인스턴스 생성이 된 것이 아니기 때문에 이 줄에는 다른 코드를 못쓴다.
    this("이름없음", 1); // 밑에 있는 생성자 호출.
    // 이 line부터는 인스턴스 생성이 됐기에 다른 코드 쓸 수 있다.
  }

  public Person(String name, int age) {
    this.name = name;
    this.age = age;
  }
}
그렇다면 왜? 굳이?? 멀정한 생성자 냅두고 this로 생성자를 호출하는 것일까? 이는 초기화 하기 위한 똑같은 코드의 생성자가 있다면 불필요한 코드의 반복없이 본인이 원하는대로 초기화 시키고 싶기 때문이다.
위 경우로 보자면, 생성자를 main에서 호출하여 인스턴스를 생성할 때, argument를 안줬다면 Person(){ this("이름없음", 1); }이 실행되는 것이다. 이 처럼, argument를 안줘도 초기화가 되고 싶게 할 때 쓰일 수 있다. 만약 this를 안쓴다면 아래와 같이 쓸 수 있을 것이다.
public class Person {

  String name;
  int age;

  public Person() {
    this.name = "이름없음";
    this.age = 1;
  }

  public Person(String name, int age) {
    this.name = name;
    this.age = age;
  }
}
이렇게 쓰게 된다면 불필요한 코드의 반복이기 때문에 우리는 this를 사용하여 다른 생성자를 호출하여 초기화 하는 것이다.