on
Spring-Security 3 - Form Logout
Spring-Security 공부 시작!
인프런 정수원 강사님의 강의를 보고 정리하는 글을 작성한 것이다.
이전시간에는 login에 대해서 알아봤다. 로그인이 어떤 흐름으로 진행되고, 어떤 클래스가 어떤 역할을 하는지 하나하나 살펴봤다. 로그인이 있으면 당연하게도 로그아웃 기능도 있기에 이번에는 로그아웃에 관해 공부해볼 것이다.
Logout, LogoutFilter

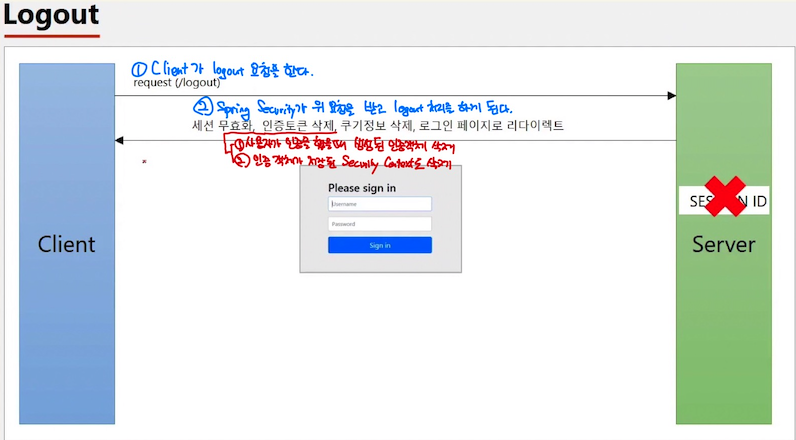
사진 출처 : 인프런 정수원 강사님 - 스프링 시큐리티
- Client가 logout 요청을 한다.
/logout으로 POST 요청. (Spring security는 로그아웃을 기본적으로 POST방식으로 처리한다!) - Spring Security가 요청을 받고 logout 처리를 하게 된다.
- 세션 무효화
- 인증토큰 삭제
- 사용자 인증 객체 삭제
- 인증 객체가 저장되어 있던 Security Context도 삭제
- 쿠키정보 삭제
- 로그인 페이지로 redirect
인증 API - Logout
http.logout()
로그아웃 기능이 작동함.
.logoutUrl("/logout")
로그아웃 처리를 해주는 URL. Default 는 /logout이지만 바꿀 수 있다. 바꾸게 되면 UI에서도 바꿔줘야 한다!

.logoutSuccessUrl("/login")
로그아웃에 성공한 후 이동할 페이지를 정해줄 수 있다.
.deleteCookies("remember-me")
로그아웃 후 쿠키 삭제
.addLogoutHandler(logoutHandler())
로그아웃 handler.
.logoutSuccessHandler(logoutSuccessHandler())
로그아웃 성공 후 핸들러
Logout Filter

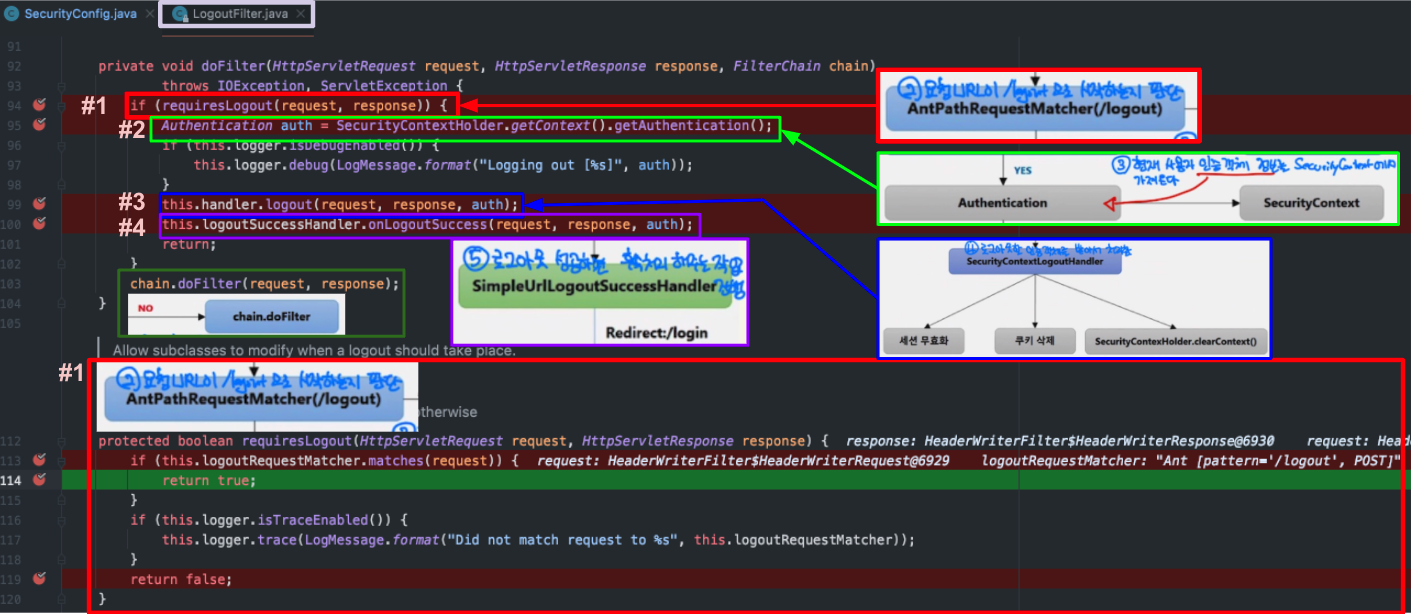
로그아웃 요청을 하게 되면 LogoutFilter가 로그아웃 과정을 처리해준다. 그 흐름을 보도록 하자.
- Client가 로그아웃 요청(
POST)을 하게 되면LogoutFilterclass가 해당 요청을 받아서 처리한다. - 받은 요청 URL이
/logout인지 판단한다.- 아니라면
chain.doFilter
- 아니라면
- 현재 로그아웃을 하려는 사용자의 인증 객체 정보를
Security Context에서 가져온다. SecurityContextLogoutHandler가 로그아웃을 처리해준다.- 로그아웃이 성공한 후
LogoutSuccessHandler에게 후속작업 처리를 해준다.
이전에 로그인 보다는 좀 더 간단해 보인다. 이제 코드를 하나하나 돌아보면서 어떻게 흘라가는지 보도록 하자.
Logout 과정 : Code
SecurityConfig.java class
package io.security.basicsecurity;

import org.springframework.context.annotation.Configuration;
import org.springframework.security.config.annotation.web.builders.HttpSecurity;
import org.springframework.security.config.annotation.web.configuration.EnableWebSecurity;
import org.springframework.security.config.annotation.web.configuration.WebSecurityConfigurerAdapter;
import org.springframework.security.core.Authentication;
import org.springframework.security.core.AuthenticationException;
import org.springframework.security.web.authentication.AuthenticationFailureHandler;
import org.springframework.security.web.authentication.AuthenticationSuccessHandler;
import org.springframework.security.web.authentication.logout.LogoutHandler;
import org.springframework.security.web.authentication.logout.LogoutSuccessHandler;

import javax.servlet.ServletException;
import javax.servlet.http.HttpServletRequest;
import javax.servlet.http.HttpServletResponse;
import javax.servlet.http.HttpSession;
import java.io.IOException;

@Configuration
@EnableWebSecurity // 여러 클래스를 import 하여 실행시키는 annotation. 이걸 명시해줘야 웹 보안이 활성화된다.
public class SecurityConfig extends WebSecurityConfigurerAdapter {
	@Override
	protected void configure(HttpSecurity http) throws Exception {
		/**
		 * 인가 정책
		 */
		http
				.authorizeRequests()
				.anyRequest().authenticated(); // 어떠한 요청에도.인증을 받아라  라는 뜻의 코드

		/**
		 * 인증 정책
		 */
		http
				.formLogin() // 기본적으로 form-login 방식으로 인증을 할 수 있도록 api 를 설정.
//				.loginPage("/loginPage") // root path 에 접근하려 할 때 무조건 이 페이지로 이동된다.
				.defaultSuccessUrl("/") // login 성공하게 될 경우 연결되는 path : handler 가 없으면 동작하는 것 볼 수 있다.
				.failureUrl("/login") // login 실패하게 될 경우 연결되는 path : handler 가 없으면 동작하는 것 볼 수 있다.
				.usernameParameter("userId") // default : username
				.passwordParameter("pw") // default : password
				.loginProcessingUrl("/login_proc") // 로그인 form action URL. action="/login_proc"
				.successHandler(new AuthenticationSuccessHandler() { // 로그인 성공 후 처리되는 handler
					@Override
					public void onAuthenticationSuccess(HttpServletRequest request, HttpServletResponse response, Authentication authentication) throws IOException, ServletException {
						System.out.println(authentication.getName()); // user 가 출력됨
						response.sendRedirect("/");
					}
				})
				.failureHandler(new AuthenticationFailureHandler() { // 로그인 실패 후 처리되는 handler
					@Override
					public void onAuthenticationFailure(HttpServletRequest request, HttpServletResponse response, AuthenticationException exception) throws IOException, ServletException {
						System.out.println("exception " + exception.getMessage()); // exception 자격 증명에 실패하였습니다. 출력됨.
						response.sendRedirect("/login");
					}
				}).permitAll() // login page 는 인증이 없어도 들어갈 수 있어야 하기 때문에 => 인가 정책에서 '어떠한 요청' 에도 인증을 필수적으로 받게끔 설정했기 때문
		;

    // 이번 포스팅에서 중요한 설정 코드들.
		http
				.logout()
				.logoutUrl("/logout") // default : /logout 원칙적으로 spring security 의 로그아웃은 post 방식이어야 한다. UI 의 속성과 일치해야 한다.
				.logoutSuccessUrl("/login")
				.addLogoutHandler(new LogoutHandler() {
					@Override
					public void logout(HttpServletRequest request, HttpServletResponse response, Authentication authentication) {
						HttpSession session = request.getSession();
						session.invalidate();
					}
				})
				.logoutSuccessHandler(new LogoutSuccessHandler() {
					@Override
					public void onLogoutSuccess(HttpServletRequest request, HttpServletResponse response, Authentication authentication) throws IOException, ServletException {
						response.sendRedirect("/login");
					}
				})
				.deleteCookies("remember-me")
				;
	}
}
logout에 관련된 코드는 마지막 문단이다. 보다시피 logoutHandler, logoutSuccessHandler는 우리가 직접 익명 객체로 구현했음을 알 수 있다.
LogoutFilter 처리 흐름

위 흐름도와 한번에 비교해놓은 것이다. 코드와 흐름을 전체적으로 본 다음 세부적으로 보는게 더 이해하기 좋은 것 같아서 넣어봤다.
- #1 :
pattern=/logout, POST로 요청이 들어왔기에 matcher의 조건을 만족하여 해당requiresLogout()method는 return true. - #2 : #1에서 true가 나왔기에 #2가 실행됨.
SecurityContext로 부터 로그아웃을 요청한 사용자 인증 객체를 불러옴. - #3 : 로그아웃 handler가 로그아웃 처리를 해준다.
logoutHandler는 우리가 직접 만들어줄 수도 있다. 우리는SecurityConfigclass 설정에서 직접 익명객체로 선언했기 때문에 우리가 만든 handler가 호출된다. - #4 : 마찬가지로 로그아웃에 성공하게 되면 우리가 만들었던
logoutSuccessHandler가 호출되어 실행되게 된다.
#3. LogoutHandler
#3에 대해서는 좀 더 자세히 설명하도록 해보겠다.

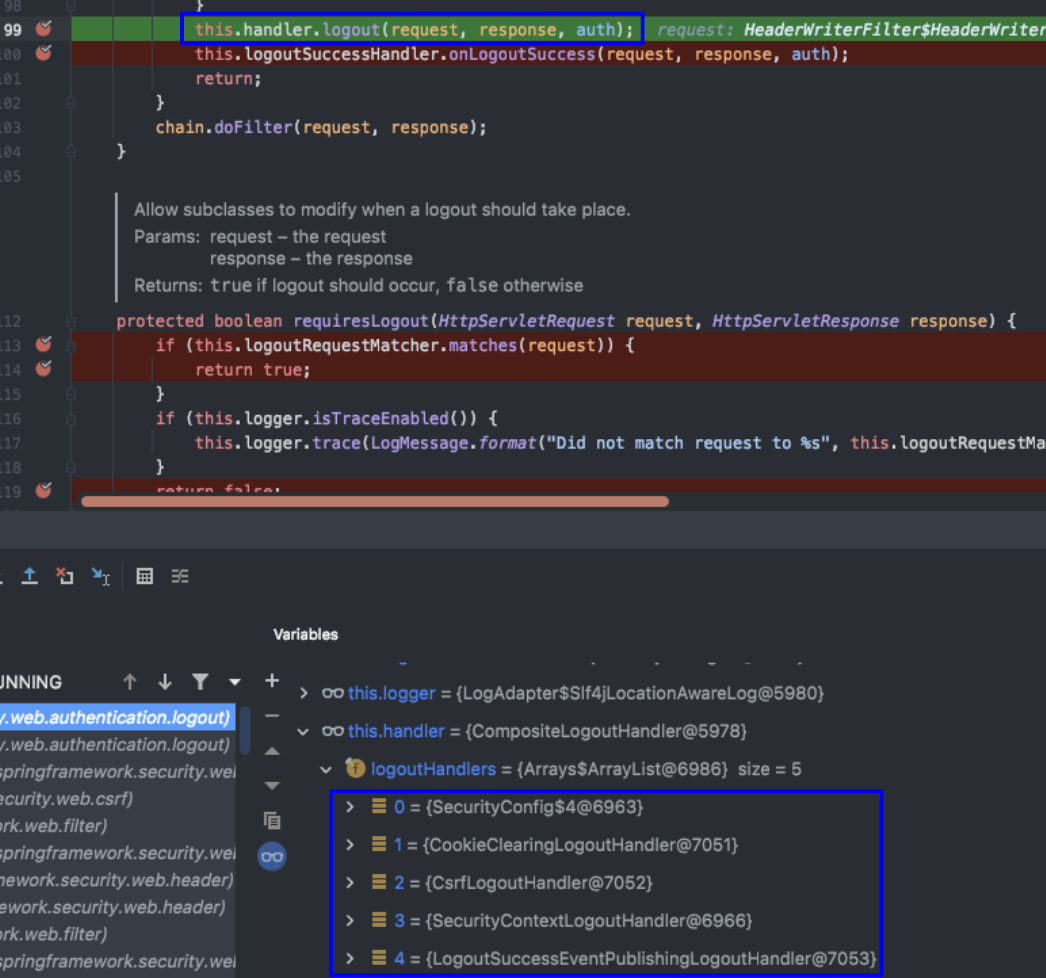
로그아웃을 실질적으로 처리해주는 일을 한다고 위에서 말했다. 그렇다면 어떤 handler들이 처리해주는 것일까?
spring-security에서는 4가지의 기본적인 logoutHandler를 제공해준다. 위 사진의 아래에 있는 파란박스를 보면 5개의 handler가 있음을 볼 수 있다. 0번째에 있는 handler는 우리가 SecurityConfigclass에서 선언해준 handler이다. 그리고 이 handler를 갖고 있는 class가 CompositeLogoutHandler라는 class이다.

CompositeLogoutHandler class는 LogoutHandler interface의 구현체이다. 그리고 위에 보이는 logout() method가 handler들을 모두 각각 실행시키고 있는 것이다.
로그인 보다는 간단했던 것 같다. 그리고 공부하면서 느낀 것은 filter class의 형태가 비슷하다는 점이었다.
- 요청 받기
- 요청이 로그인 or 로그아웃인지 확인
- 적절한 처리
로그인보다 간단한 것도 있었지만, 위와 같은 공통된 형식이 느껴져서 좀 더 이해하기 쉬었다.